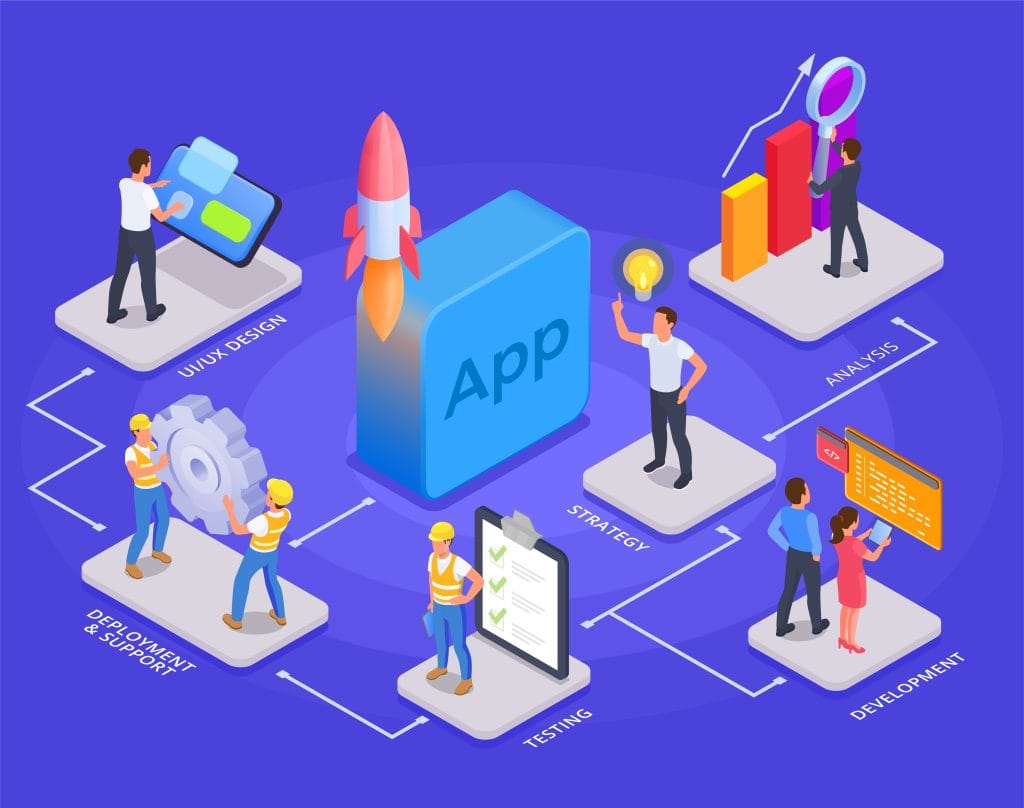
Building a mobile app is an exciting journey, especially for first-time founders. However, it can also feel overwhelming if you’re new to the technical process. Understanding the mobile app development lifecycle – from the initial idea all the way to launch and beyond – will help you plan better, communicate with your team, and set realistic expectations. With the mobile app market booming (downloads are expected to reach 270 billion by 2025 (inoxoft.com), having a clear roadmap from day one can make the difference between a smooth launch and a stalled project.
In this guide, we’ll walk through each stage of the mobile app development lifecycle in a practical, founder-friendly way. From ideation and discovery to design, development, testing, deployment, and maintenance, you’ll learn what happens at each step. We’ll also highlight examples of tools and technologies (like Figma, Flutter, React Native, Firebase, GitHub, etc.) that are commonly used, and who’s typically involved. By the end, you should have a solid high-level understanding of how an app goes from a concept to a live product – and what comes after launch. Let’s dive in!
Ideation
The lifecycle begins with ideation – turning a raw idea into a well-defined app concept. At this stage, the goal is to clearly identify the problem you want to solve and who your target users are. Ask yourself: What value will this app provide? and Who needs this solution? It’s important to gather input from potential users, industry experts, or anyone who might have insight into the problem area. During ideation, founders often conduct basic market research and brainstorm features that could solve the identified problem.
Key activities in the ideation stage include:
- Defining the core idea and purpose: What does the app do, and why will people use it?
- Identifying target users and their needs: Who is the ideal user, and what pain points are you addressing?
- Researching the competition: Look at similar apps or solutions currently available. What do they do well, and where are the gaps you can fill?
The outcome of ideation should be a clear value proposition for your app and an initial feature list. In fact, the ideation phase is where you determine what needs to be built, who the end-user is, and the product’s purpose (kissflow.com). In other words, by the end of this stage you should know what problem you’re solving, for whom, and what your app will broadly do to solve it.
Discovery (Research and Planning)
Once you have a solid idea, it’s time for the discovery phase. This stage is all about reducing uncertainty before any heavy design or coding begins. Often this starts with deeper market research and user validation to ensure your concept has demand. You also confirm the idea’s feasibility (both market and technical) and create a high-level plan for development. Early-stage founders might work with product managers or business analysts during this phase, but even if you’re on your own, the goal is to think through the app in detail before writing code.
Typical tasks in discovery include:
- Requirements definition: Translate your idea into a structured list of requirements. Define all the features and functionalities in detail. What should the app do exactly? Prioritize these requirements to decide what’s in scope for the first version (your MVP).
- Technical planning: Decide on the technical approach. Will you build for iOS, Android, or both? Should it be a native app, or use a cross-platform framework like Flutter or React Native? Consider back-end needs as well – e.g., using a cloud service like Firebase for data storage and authentication.
- Project planning: Outline a rough timeline and budget. How long might development take, and what resources (people, tools) will you need? Also identify any risks or unknowns early on.
By the end of discovery, you should have a project roadmap and a validated concept. Many startups create a Product Requirements Document (PRD) or a lean canvas at this stage to summarize the plan. Essentially, discovery turns the idea into a concrete action plan – translating the concept into detailed requirements, mapping out features, and even starting technical documentation (kissflow.com). Skipping thorough discovery can lead to surprises later – it’s the foundation that guides all subsequent stages.
Design (UI/UX Design & Prototyping)

With a clear plan in place, you can move into the design phase. This stage is about how your app will look and feel. In simple terms, design takes the “what” from the previous stages and figures out “how will the user experience it?” Excellent UI/UX design is crucial because it directly impacts user satisfaction. Even a great idea can flop if the app is confusing or unpleasant to use.
During design, a UI/UX designer (or sometimes the founders themselves, for an MVP) will work on:
- Wireframes: basic layouts of each screen focusing on structure and flow (not final visuals). They map out where content and buttons go, and how screens connect.
- Mockups & visual design: high-fidelity images of the app screens, adding colors, fonts, and visuals to the wireframes. This is done in tools like Figma, Sketch, or Adobe XD, resulting in polished screen designs.
- Interactive prototyping: linking your screens into a clickable prototype (using Figma’s prototype mode or InVision). This simulates the user journey and lets you gather feedback from users or stakeholders before any code is written.
Design is typically an iterative process – designs may go through multiple revisions. It’s cheaper and easier to tweak a design than to change code later, so this is the time to iron out usability issues. Importantly, a good design should align with the needs identified earlier. A well-planned design prevents costly changes down the road – failure at the design stage often results in cost overruns and project delays later (kissflow.com). By the end of this phase, you should have a complete prototype or set of app screens that visually demonstrate the app’s interface and flow.
Development (Coding the App)
Now comes the stage where the idea truly turns into a working product: development. In this phase, software engineers (or your development team/partner) write the code for the application based on the requirements and designs. It’s common to break development into sub-parts, often following an agile methodology (e.g. working in sprints to build features incrementally). For a mobile app, development typically includes:
- Front-end development: building the actual mobile app that users install on their phones. If you chose to go native, this means coding separately in the native languages (Swift for iOS and Kotlin for Android). If you chose a cross-platform approach, developers might use frameworks like Flutter or React Native to write one codebase for both platforms. These cross-platform tools are popular because they cut development time for iOS and Android by enabling a single codebase (nomtek.com).
- Back-end development: if your app requires a server or external services (to store user data or provide an API), developers build those systems and integrate any external services (e.g. databases, payment gateways, analytics).
Developers will follow the design blueprint closely and build features according to the specs defined earlier (kissflow.com). Regular check-ins or demos (say, at the end of each sprint) are useful so you as a founder can see progress and give feedback early. All critical issues should be resolved before launch. By the end of this phase, you’ll have an MVP (Minimum Viable Product) version of the app: a working app that includes your core features, ready to be tested.
Testing (Quality Assurance)
Before releasing to real users, your app needs thorough testing. Testing often overlaps with development – it’s best to start testing components early instead of waiting until the end. The goal is to find and fix bugs and ensure the app works as intended in all scenarios. A buggy app can quickly turn off users, so this stage is critical.
Key testing activities include:
- Functional testing: ensuring every feature does what it’s supposed to do. Test all user flows to make sure everything behaves correctly.
- Usability testing: getting real people (maybe a small group of beta testers) to use the app and give feedback. They might catch confusing UI elements or steps that developers overlooked.
- Performance and device compatibility: test on different devices and conditions to ensure the app runs smoothly and quickly without crashes or slowdowns.
Often, a QA engineer or tester will lead this effort, but on a small startup team, developers and founders share the responsibility. All critical bugs should be fixed before launch. (It’s common to do multiple test cycles – fix issues, release a new build, and test again.) Remember, testing checks whether the app meets the original requirements and prevents releasing a low-quality app (kissflow.com). Various testing methods (unit tests, integration tests, user acceptance testing, etc.) should be employed to ensure a high-quality app before you finally ship it (moontechnolabs.com).
Deployment (Launch)
Deployment is the moment of truth – launching your app to the world. In this stage, you release the app to the target platforms (typically Apple’s App Store for iOS and Google Play Store for Android). Deployment involves several steps and considerations:
- App Store submission: Prepare the necessary app listing (name, description, screenshots, etc.) and submit your build for review. Ensure you meet all Apple/Google guidelines to avoid rejection (Apple’s review can take a few days and has strict policies) (moontechnolabs.com).
- Release strategy: Decide how to launch – maybe a small beta first or straight to full release. Ensure any backend servers are live and ready to handle users. You can release the app to the store as a phased rollout (to a percentage of users initially) or a full launch depending on your strategy.
- Monitor and respond: The first days after launch are critical. Keep a close eye on crash reports and user feedback (using analytics and crash-reporting tools) so you can address any urgent issues quickly (moontechnolabs.com).
Launching an app isn’t just pressing a button – it’s coordinating a lot of pieces to make sure the public release goes smoothly. It’s a good idea to have a checklist for deployment (covering things like final testing, marketing materials, support plans, etc.). Once the app is live, take a moment to celebrate – but remember, this is not the end of the journey!
Maintenance (Post-Launch Improvements)
Once your app is live, you move into maintenance mode. This phase is about keeping the app running smoothly, listening to users, and continuously improving the product. Maintenance encompasses a few key areas:
- Bug fixes & support: Real users will inevitably find bugs or have questions. Be ready to patch issues quickly (users expect fast updates) and provide support – respond to reviews, emails, or support tickets to show users you care.
- Feature enhancements: As you gather usage data and feedback, you’ll identify new features or changes to make the app better. Prioritize these and plan them into your development roadmap. Essentially, you loop back into an ideation -> development cycle for each update.
- Performance & updates: As your user base grows, ensure the app continues to run smoothly – this may involve optimizing code or scaling servers. Also keep the app up-to-date with the latest OS releases and new devices, so everything remains compatible.
Think of maintenance as an ongoing cycle rather than a one-time task. Your team should continuously monitor the app’s performance and user satisfaction. Once the app is released, maintenance ensures continuous enhancements, further bug fixing, and code refinement (kissflow.com). In other words, staying responsive to user needs and platform changes is crucial for your app’s long-term success.
Roles and Tools at Each Stage
To give a clear overview, the table below summarizes each stage of the lifecycle along with who is involved and common tools/technologies used:
| Stage | Key Roles Involved | Common Tools/Tech Used |
|---|---|---|
| Ideation | Founder/Product Owner | Whiteboards, mind-mapping (Miro), surveys |
| Discovery | Product Manager, Analyst, Tech Lead | Research, Trello/Jira boards, Wireframing tools |
| Design | UI/UX Designer | Figma, Sketch/InVision |
| Development | Mobile Developers, Backend Developer, PM | Xcode/Android Studio, Flutter/React Native, GitHub |
| Testing | QA Engineer, Developers | JUnit/XCTest, Appium, Jira |
| Deployment | DevOps, Developer, PM | CI/CD (GitHub Actions), App Store Connect, Play Console |
| Maintenance | Developers, Support, PM | Analytics (Firebase), Crashlytics, Support tickets |
Note: In a small startup, one person might wear multiple hats (for example, a single founder could act as product manager and QA, or a developer might handle DevOps). The tools listed are examples – there are many alternatives – but these are commonly used options that early-stage teams often leverage.
Conclusion and Next Steps
Understanding these stages helps you as a founder to set realistic expectations and bring in the right expertise at the right time. Remember, launching your app is just the beginning – the most successful apps continue to evolve through user feedback and iteration. If you’re ready to build your app, consider partnering with experienced developers or mentors for guidance (for example, you might book a discovery call with a development team to plan your next steps). Stay user-focused, stay agile, and you’ll be well on your way to turning your app idea into a thriving product. Good luck on your app development journey!